UE4: Tree-cutting system breakdown
NOTE: This was originally written in 2015 on an old blog page, I’ve just brought it back onto a public page in case someone finds it useful.
Update: Here’s a direct download link to a sample project with this system in place. Hope you find it useful! https://drive.google.com/drive/folders/1HWf8twQKJLlQ5_q49I0UrPFO8u84iYmG?usp=sharing
Recently I worked on a tree-cutting system for a project I’m helping work on, in Unreal Engine 4. After going over some potential ideas for how it could work, we settled on utilizing material displacement to affect the mesh in a way that is similar to how wood is cut in real life. Displacement alone wasn’t quite enough to pull off the full effect, but it plays a large part in representing tree-cutting in a dynamic, realistic way.
The way it works requires a little bit of extra prep work on the mesh development side. You shape out the tree, get the poly count you want, and then use a vertex color painter to get a cut-mask around the base of the tree, like so:

It’s also important to duplicate this mesh, then select the faces on the duplicate mesh that are painted white with the vertex color painter, and delete them. From there, select the bottom portion of the mesh (the stump) and extract it to it’s own mesh. Fill in the missing faces of both (now separate) meshes, and be sure to apply the same UV mapping to all 3 meshes, so they look like they’re all the same piece, just split up. The extra pieces will be your physics actor and your stump actor:

In the material, you call on the vertex color, and use the R channel as a displacement mask. From a basic level of testing, you can apply inward (negative scalar/constant values) displacement, and the mesh will push inward using UE4’s PN Triangles displacement.
Unfortunately, what we needed wasn’t that simple. It was a good start, but it wasn’t all we needed it to be:

The mesh displaces, but on every side of the mesh all at once, and the bark texture is still there, looking like we’re just tying a belt around it and tightening the belt.
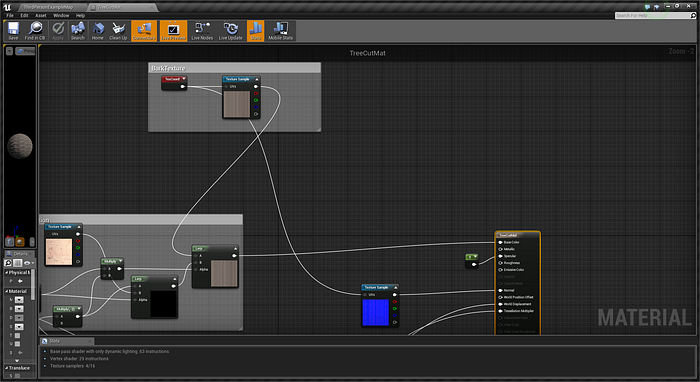
To make things look a bit better, I masked in a second, lighter wood texture (the inside of the log) but I lerped it in so that it would only show when the displacement is occurring. Since the displacement would be increased (or decreased, since negative values, but whatever) in, “chunks,” I could get away with the lerp value chopping (pun) more towards the lighter texture, as if you were cutting deeper into the log:
So that settled the color issue, but the, “belting,” for lack of a better term, was still occurring. Thankfully, sphere masks exist.
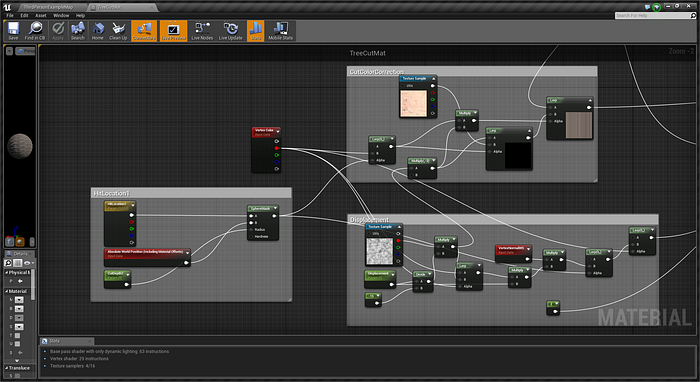
NOTE: The Displacement Scalar Parameter is being divided by a constant value of -15. This is to force the displacement inwards, and doesn’t represent any specific equation that fits every mesh, it just fit the mesh I used to test this system, because it scales the displacement adequately per-hit.
The sphere mask in UE4 is most notably used in the default sky sphere to place the sun in the sky. It works by translating worldspace coordinates to material vector coordinates, allowing locational material changes in the shape of a dot on the UV coordinates. I couldn’t use just the sphere mask, as having a perfect sphere popping out of the tree would look silly. So instead, I used the sphere mask to set the location of the displacement, within a configurable limited radius (CutDepth1 Scalar Value) so that it wouldn’t hit the circumference of the tree all at once, and then I masked that through the vertex mask so it only chopped out a thin line, similar to if an ax were chunking it out, and voila, the displacement looked much more convincing:
From there, I set up a (crude) blueprint to showcase how it could work if implemented with better programming skill:

So to start, the blueprint is rooted from the tree mesh. HitLocation1 is a collision sphere that I put in place for testing purposes, though ideally you’d want to have the collision sphere generated from a hit trace generated by the player. ActiveZone1 is a collision box that covers an area surrounding the tree, allowing player input. This isn’t reallynecessary, but again, this was quick and dirty, and is good for simulating/controlling swing distance. FallilngTop and Stump are the two (duplicated from original and separated) mesh actors that replace the root static mesh actor after enough hits are registered. (See below.)
CutDepthLocation1 is a value that feeds directly to the Displacement scalar value in the material, and controls how deep the displacement is.
CDInfluence1 is a value that feeds directly into the CutDepth1 scalar value in the material, which controls how much of the circumference of the log is affected. The smaller it is, the smaller surface area the cut is, the bigger it is, the wider the cut gets. Scaling both the depth and the width of the cut, as well as lerping in the wood color change on each hit makes the end result look pretty convincing.
In the construction script, you’ll notice that CutDepthLocation1 is feeding into the Displacement Scalar Parameter Value node, after being multiplied by 1.75. That’s just a value to scale up the displacement to make it noticeable, while not going overboard, as too much displacement will make the mesh start poking out the other side of itself. I had to play a little balancing game to get to that value, but for my mesh it worked nicely. If spawning the hit location based on a player hit location, you’ll want to have that hit location refreshed on every player hit. The reason for this is if you only register the displacement location from the first hit, if the player hits once, then goes around to the other side of the tree, and hits, they’ll only see the chunk chipping off of the tree from the first side they hit. You also have to balance the number of hits you want, versus the amount of displacement that will occur, because again, you don’t want your mesh to displace too much, it can look pretty ugly if overdone.
Let’s move on to the event graph:
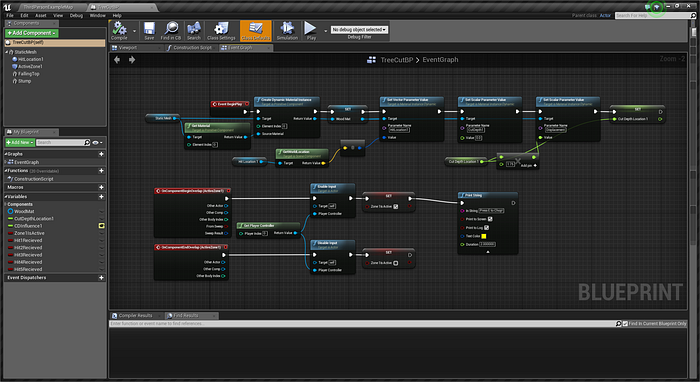
Below that, we have two event nodes, OnComponentBeginOverlap and OnCompenentEndOverlap, which both belong to ActiveZone1, the area in which the player needs to be so they can hit the tree. (Swing distance control.) When the player is in the ActiveZone, input from the player to the tree blueprint is enabled, and when the player isn’t, input is disabled. Also, when input is enabled, for testing purposes I made the BP print a message in the corner to tell the player they are within swinging distance. (Press E to Chop!)

Further down, we have another event node, which fires when the E key is pressed. A series of checks fire next, to control various factors. The first check is to make sure the player is within swinging distance. (Boolean variable, “Zone1IsActive.”) Next it checks to see if the first hit has been recieved. (Boolean variable, “Hit1Recieved.”) If it hasn’t, it multiplies the CutDepthLocation1 value by 1, and sets that returned value to the CutDepth1 value in the material. CutDepthLocation1 needs to be scaled depending on the size of your mesh, so I don’t have an exact number to give you to plug into it here. After hit one is registered, when the player hits E again, the BP will check to see if a 2nd hit has been registered. Much of the next few steps are the same, with the main difference being the amount of displacement being applied after each hit, which increases. Each time a hit is registered, a printstring message displays that says, “chop!” letting the player know that they’ve successfully hit the tree. (Again, not necessary, just there for testing purposes.) After Hit5 has been recieved, the player will hit E again, which launches the last portion of the blueprint.

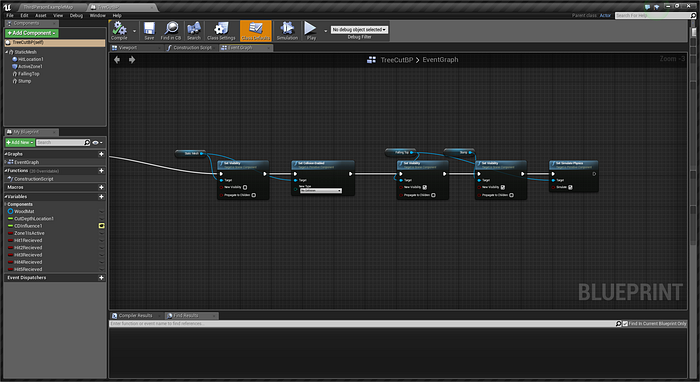
First, a screen message pops up that says, “TIMBER!!!” letting the player know that the tree is falling. Next, the visibility and collisions of the regular tree mesh are disabled, and the Falling Top and Stump mesh visibility variables are turned on, and the Falling Top Simulate Physics variable is turned on, so that it falls over:
http://gfycat.com/BoilingDearestFantail
And there you have it! This is a pretty rough example, but applying these principles to prettier assets could work wonderfully for a tree-cutting system! You would of course want an ax actually hitting the tree, and you could even have the splinter/wood-chips particle effect fire when the ax hits. The possibilities are all there!
I hope you find this information useful, but if you have any questions, feel free to leave a comment, and I will do my best to help!