UE4: Understanding Splines
A tutorial
Disclaimer: This tutorial assumes that the reader has a basic understanding of 3d modeling concepts and scripting with blueprints in UE4. Much of the information, i.e. the base for the construction script for this system, is derived from this video tutorial. If you just want to skip ahead to the building of this system without analysis or definition, check out the video, and thank you to Playful Synapse for the great tutorial.
Intro
Splines are a fantastic resource for taking linear resources and dynamically shaping them to fit your likely non-linear worldspace, without having to a) use up valuable artist time measuring and scaling static curved objects to fit an exact setup, and b) overload your asset library with multiple iterations of similar objects to fit those setups.
A spline mesh, what this post is covering, is a conjunction of the computational spline with a static mesh, allowing a great deal of variance and transformation from the mesh’s initial shape and bounds. Popular uses of the spline mesh include construction of rivers, roads, ropes and cables, and even fences. In this post, I’ll be using the example of creating caves using spline meshes. (Note: This tutorial was created using Unreal Engine v. 4.11.1)
Understanding Splines
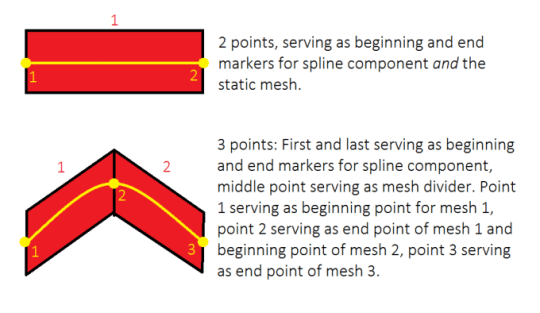
So how does a spline mesh work in UE4? Well, first we need to take a look at what exactly a spline component is in the context of UE4. It is essentially a linear line with two ends, called points. More points can be added to a spline between its beginning and end points, which are what give a spline its shape. The more points you add, the more shape variation you can have. Taking this concept, we add a spline mesh component, which applies a static mesh or meshes to the spline (depending on how many points there are) and lines the mesh up along the line direction between the points. Starting out adding a spline mesh, you’ll have 2 points, constituting the beginning and end of the spline, and of the spline mesh. But when you add another point in between the beginning and end points, the blueprint actually adds a second mesh, using the 3 points as beginning and end coordinates for the beginning and end of your mesh, using a forward vector that you identify in the blueprint. (I’ll get to forward vectors in a second.) Here is a diagram to illustrate the concepts of how splines, spline points, and spline meshes work together:

So say your tunnel piece moves, “foward,” in the sense of walking through the tunnel, on the X axis; the forward vector for your spline mesh component will be in the X direction. If this were the case but you instead used the Y axis as your forward vector, the mesh would be scaled and duplicated side by side, instead of extending the length of the tunnel itself.
This may be a bit confusing, but it starts to make sense as you build the script and play with the blueprint in UE4.
Getting Started
The first thing we’re going to need is a cave asset that will be used as a static mesh. Since this tutorial is more for the scripting and less for the art, I’m not going to spend a huge amount of time on the example mesh. Here’s a link to download the fbx.
When you import the tunnel mesh, be sure to uncheck Auto-Generate Collisions, as I have generated the fbx file with collisions included. Once you have the mesh imported, right click inside the content browser, and under Create Basic Asset, click Blueprint Class. In the Pick Parent Class window, select Actor. Name your blueprint actor something like, “BP_Cave,” or something similar. (Note: It’s a good idea to get into the habit of using naming conventions to better organize your asset library.)
Double click on your new blueprint actor, and you’ll see the blueprint editor pop up. The first thing you’ll want to do is click add component, and search for Spline Component. Navigate to the construction script, and we’ll get started on building the script that will control our spline actor.


The first section of the script, highlighted here, sets up the repeat-behavior of adding in spline points.

The next section of the script, highlighted here, sets up the creation of the mesh or meshes along the spline points, and the attachment of the ends of multiple meshes along the spline when it has more than 2 points.
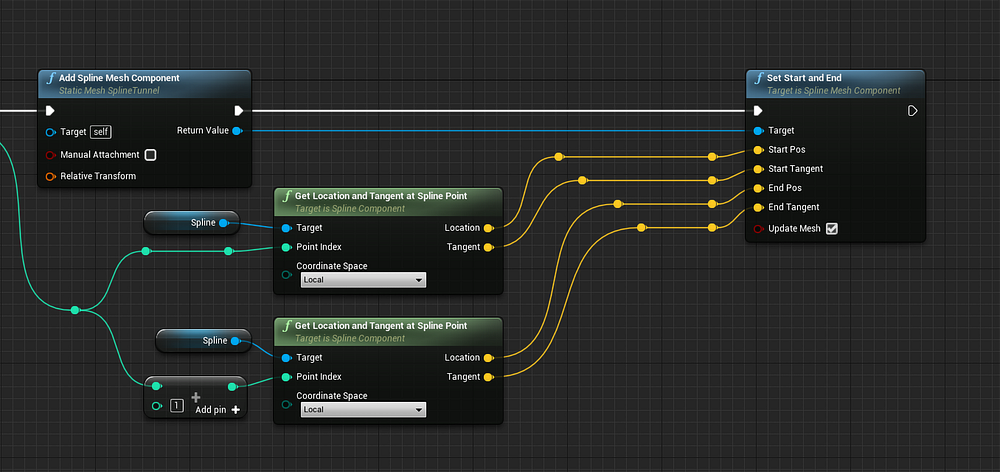
The last node in the sequence does what it suggests - sets the start and end points of the mesh or meshes. In order to access this node, you’ll need to drag off of the return value on the Add Spline Mesh Component node.
We also need to set what mesh is being spawned, and the mesh’s forward vector. In this case, we’ll be using the X axis for the forward vector. It’s also important to set the mesh mobility to moveable, as its shaping will be changing to some extent during placement/deformation. (I’ll discuss what kind of deformation occurs later.) This is done in the Details panel of the Add Spline Mesh Component node.

And that’s it for the construction script! You can now drag your blueprint into the level editor and play around with it. When you first drop it in, the first two points may be close together, and it may seem like there are a lot more than just the two first points. This is because each point also has a tangent bar that can be used to control the intensity of the curve between each spline point. (If you look at the first diagram, you’ll notice that the mesh appears straight, but the spline lines are curved, this is due to spline points approximating their shape between points on an auto-curve rather than linearly.) To move a spline point, select the point, not the tangent bar, and move it around, and you’ll start to see mesh deformation occurring. Moving the end point away from the beginning point will pull and stretch the mesh out to follow the spline point location. You can right click on the spline line between the beginning and end points and add a point along your spline, which will then split the mesh into two instances of that mesh, using that spline point’s location to set the end location along the first mesh components forward vector, and the beginning location along the second mesh components forward vector. Along with just scaling/skewing the mesh, it may also deform it along the spline path, but how straight or curvey this deformation is depends on how many vertices your mesh has. If you were to use a cube mesh with no extra vertices other than the ones necessary to form the cube shape, the deformation would be very rigid and sharp, but if you had a subdivided cube mesh with multiple extra vertices, more curvey, smooth deformation would occur, as the extra vertices would serve as more, “curve points,” so to speak:

This version of the mesh was not subdivided, so only the vertices necessary to form the shame were present, resulting in sharp corners between meshes.

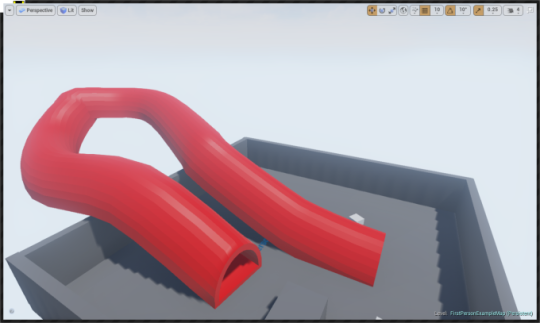
This version of the mesh (the one in the download link above) was subdivided, so there’s a bit more curvature-deformation occurring on each mesh, serving to approximate the upcoming direction change (if applicable) on the next mesh along the spline.
And there you have it! You’ve successfully created a spline mesh blueprint! Pat yourself on the back!
Caveats
While splines themselves are very helpful in creating dynamically shaped components, there’s still some work that needs to be put in the art side, particularly in making your spline meshes modular and seamless, at least end to end. This mesh is particularly easy to maintain regularity at both ends, but breaking into more organic shapes (such as caves) you’ll need to take care to make things match up. In addition, when adding curvature by way of subdivisions or any other form of adding extra vertices, it’s important to add these modifiers to your collision meshes as well. If you don’t, you may find yourself with a mesh that curves and approximates direction changes more than your collisions do, causing errors like collision blocks or actors clipping through your mesh or meshes.
